Showing posts with label opencv. Show all posts

HSV values of Image pixel using JavaCV


This post will explain how to get HSV color space values of Image pixel using JavaCV.
For JavaCV setup on Windows, follow link below
http://opencvlover.blogspot.in/2012/04/javacv-setup-with-eclipse-on-windows-7.html

If you want to access RGB color space values, then refer to link below
http://opencvlover.blogspot.in/2013/02/rgb-values-of-image-pixel-using-javacv.html

Pixel values in HSV color space are often required in Image processing. Following gist demonstrates how to access and print pixel values in HSVcolor space. We first convert image from RGB color space to HSV color space using 'cvCvtColor()''. We can call 'cvGet2D()' function to access image matrix and use it get pixel values at desired location.

This will print HSV values in console. This code comes really handy while using manual threshold.
You can fork me on github for complete project of this code.
https://github.com/nikhil9/getHSV

RGB values of Image pixel using JavaCV

This post will explain how to get RGB color space values of Image pixel using JavaCV.
For JavaCV setup on Windows, follow link below
http://opencvlover.blogspot.in/2012/04/javacv-setup-with-eclipse-on-windows-7.html

If you want to access HSV color space values, then refer to link below
http://opencvlover.blogspot.in/2013/02/hsv-values-of-image-pixel-using-javacv.html

Pixel values in RGB color space are often required in Image processing. Following gist demonstrates how to access and print pixel values in RGB color space. We can call 'cvGet2D()' function to access image matrix and use it get pixel values at desired location.


This will print RGB values in console. This code comes really handy while using manual threshold.
You can fork me on github for complete project of this code.
https://github.com/nikhil9/getRGB

Face Detection in JavaCV using haar classifier

OpenCV provides haar like feature detection algorithm which can be used for object detection. Wikipedia page http://en.wikipedia.org/wiki/Haar-like_features provides nice information about what are haar like feature.

OpenCV also provides haar training utility which can be used for training. It generates XML file from training samples which further can be used for fast object detection. Such XML file is provided with opencv package for face detection.

Gist below explains how to use haar classifier in JavaCV. Code loads classifier file haarcascade_frontalface_default.xml and uses cvHaarDetectObjects() to find faces in loaded image. More information about cvHaarDetectObjects() can be found at http://opencv.willowgarage.com/documentation/object_detection.html#haardetectobjects

Result of this code generates window which shows loaded picture and red rectangle around detected faces.


You can fork complete eclipse project at https://github.com/nikhil9/FaceDetection/

Hough Circle detection in Javacv

Opencv provides Hough circle Detection algorithm which can be used to detect circles. Some information about how algorithm works and its example using Opencv in cpp can be found in below link

We will see how to use cvHoughCircle using Javacv. first we will have to process image to get grayscale or binary image. Using cvSmooth() helps most of the time for good detection however it depending upon kind of object  and background more image processing may be required.

First we will load image and then convert it to grayscale. Then use cvSmooth() to smooth the edges. cvHoughCircle() is used to detect circles and are stored in CvSeq. cvGetSeqElem() is used to extract each circle. We have to use each element in CvPoint3D32f. Center of circle is obtained in CvPoint type using cvPointFrom32f(). Obtained center and radius is used to draw circle on input image using cvCircle.

Following code is a demonstration of all the above processes.


Input Image:

Output Image:

OpenCV 2.3.1 with CodeBlocks on Ubuntu 12.04

For Installing OpenCV 2.3.1 on ubuntu 12.04 please refer to previous post
http://opencvlover.blogspot.in/2012/05/install-opencv-231-on-ubuntu-1204.html

Once the installation is done, install codeblocks as mentioned in previous post http://opencvlover.blogspot.in/2011/07/installing-opencv-with-codeblocks-ide.html

Create a new console application as mentioned in above post and go to Build Options.
Make sure that GNU GCC compiler is selected in compiler drop down option.
Go to Linker Settings tab and Link libraries which are located at /usr/local/lib/ and looks like 'libopncv_*.so'
An example is shown in image below


Now go to Search directories and under Compiler tab add following location
/usr/local/include/opencv2
Here is a screenshot


Now we are ready to run OpenCV 2.3.1 on Code Blocks running on Ubuntu 12.04.
Here is a sample code to test the installtion


Install Opencv 2.3.1 on Ubuntu 12.04 Precise Pangolin

Here are instructions for installation of Opencv 2.3.1 on Ubuntu 12.04 Precise Pangolin. For opencv installation we need FFmpeg, x264, v4l and their dependencies. It is a bit longer process as compared to windows installations. Step by step process is shown below.

1. Install dependencies for FFmpeg and x264
Enter following lines in terminal to check and install dependencies.
  
sudo apt-get install build-essential checkinstall git cmake libfaac-dev libjack-jackd2-dev libmp3lame-dev libopencore-amrnb-dev libopencore-amrwb-dev libsdl1.2-dev libtheora-dev libva-dev libvdpau-dev libvorbis-dev libx11-dev libxfixes-dev libxvidcore-dev texi2html yasm zlib1g-dev


2. Install Gstreamer by entering following lines in terminal
sudo apt-get install libgstreamer0.10-0 libgstreamer0.10-dev gstreamer0.10-tools gstreamer0.10-plugins-base libgstreamer-plugins-base0.10-dev gstreamer0.10-plugins-good gstreamer0.10-plugins-ugly gstreamer0.10-plugins-bad gstreamer0.10-ffmpeg


3. Download recent version (0.8+)of FFmpeg from https://github.com/FFmpeg/FFmpeg extract it and go to the directory. Now configure and install FFmpeg by entering following commons one by one.

./configure --enable-gpl --enable-libfaac --enable-libmp3lame --enable-libopencore-amrnb --enable-libopencore-amrwb --enable-libtheora --enable-libvorbis --enable-libx264 --enable-libxvid --enable-nonfree --enable-postproc --enable-version3 --enable-x11grab
make
sudo make install


4. Install recent version of x264 from ftp://ftp.videolan.org/pub/videolan/x264/snapshots/ extract it and go to the directory. Now configure and install x264 by entering following commons one by one.

./configure --enable-static
make
sudo make install


5. Download video for linux v4l libs from http://www.linuxtv.org/downloads/v4l-utils/ extract it and go to the directory. Install v4l using following command.
make
sudo make install


6. Install gtk libs using apt-get
sudo apt-get install libgtk2.0-0 libgtk2.0-dev


7. Install libjpeg using following command
sudo apt-get install libjpeg62 libjpeg62-dev


8. Now our dependencies are complete. We can install Opencv now. Download Opencv from http://sourceforge.net/projects/opencvlibrary/files/opencv-unix/ Extract it and go to the directory. Enter following command to configure and install Opencv
mkdir build
cd build
cmake ..
make
sudo make install


We are done with installing Opencv on ubuntu 12.04 Precise Pangolin. In order to set path open /etc/bash.bashrc using your favorite text editor and add following lines
PKG_CONFIG_PATH=$PKG_CONFIG_PATH:/usr/local/lib/pkgconfig
export PKG_CONFIG_PATH


Restart your system and you are ready to use awesome Opencv!

Accessing webcam using javacv

Configuration steps for javacv on Eclipse running on windows 7 can be found in the link below.
http://opencvlover.blogspot.in/2012/04/javacv-setup-with-eclipse-on-windows-7.html

Instructions for importing video in javacv can be found in link below
http://opencvlover.blogspot.in/2012/05/importing-video-using-javacv.html

Accessing webcam using javacv is pretty much similar to importing video. We just have to set null parameter  while specifying video path in deceleration of OpenCVFramegrabber. Also we have to flip output from webcam horizontally to get it like mirror.

Following is the code snippet which uses OpenCVFrameGrabber to capture from webcam.


Importing video using Javacv

Configuration steps for javacv on Eclipse running on windows 7 can be found in the link below.
http://opencvlover.blogspot.in/2012/04/javacv-setup-with-eclipse-on-windows-7.html

In this post we will see how to import video in javacv for processing. Opencv uses CvCapture function for importing video. Javacv uses FrameGrabber class for grabbing video. Framegrabber can be used with 2 methods for importing video OpenCVFrameGrabber and FFMpegFramegrabber.
Following is the code snippet which uses OpenCVFrameGrabber to capture video file "Video.mp4".


If openCVFrameGrabber shows blank output or some error then try using FFMpegGrabber instead.

JavaCV setup with Eclipse on Windows 7

Update: These instructions are also applicable for 2.4+ version of opencv and javacv.

I was looking for image processing library for Java. My search stopped at JavaCV. JavaCV provides wrappers for OpenCV. so you can directly use OpenCV functions in Java. JavaCV also provides hardware accelerated full screen Image display with CanvasFrame and GLCanvasFrame.

JavaCV provides jar files which can be used with OpenCV installation. Following steps can be followed to setup JavaCV with Eclipse on Windows 7.

1.Install Java Development Kit (JDK) from the link below. Make sure to install 32bit or 64 bit as per your processor.

http://www.oracle.com/technetwork/java/javase/downloads/jdk-6u32-downloads-1594644.html

2. Install Microsoft Visual C++ redistributable package

For 32 bit: http://www.microsoft.com/download/en/details.aspx?id=5555
For 64 bit: http://www.microsoft.com/download/en/details.aspx?id=14632

3. Download OpenCV super-pack from Sourceforge and extract it in you C:\Opencv

http://sourceforge.net/projects/opencvlibrary/files/opencv-win/2.3.1/

4. Set OpenCV .dll in systems path so that JavaCV can access it.

Go to Control Panel > System Security > System > Advanced System Settings > Environment Variables
In System variable select path and click on Edit. Now add following address in Variable address. I have extracted opencv package in C:\ directory. If you have installed at different location please update address accordingly.

For OpenCV 2.4.2 and earlier version 

For 32 bit:
C:\opencv\build\x86\vc10\bin;C:\opencv\build\common\tbb\ia32\vc10\

For 64 bit:
C:\opencv\build\x64\vc10\bin;C:\opencv\build\common\tbb\intel64\vc10\


For OpenCV 2.4.3 and later version 

For 32 bit:
C:\opencv\build\x86\vc10\bin

For 64 bit:
C:\opencv\build\x64\vc10\bin


Once this is done, the most important step is to Restart Windows.

5. Download JavaCV- bin from link below and extract it.

http://code.google.com/p/javacv/downloads/list

6. Create New Java Project 'demo' in Eclipse. 

Once created, go to Project > Properties > Java Build Path > Libraries > Add External JARs .
Go to your JavaCV Extracted folder and add all jar files. It should look like the pic below


7. Now create demo.java in src folder of the project. 

Paste following code and run the project.Put your image in project folder. In my case it is 'img1.png'


Result will look like this  


Displaying image in grayscale

OpenCV provides easy way to load image as IplImage in 3 band format, grayscale format or load image as it is(in its original format). Image loading function loads image from file as IplImage by taking 2 arguments.

  1. Image file name e.g. 'img1.png' in my case.
  2. Color code as integer.
Here is my img1.png file in original format.

We can provide 3 types of color code integers
  • 'CV_LOAD_IMAGE_COLOR'
    This will load image in 3channel color image i.e. RGB image.
    we will use following code and see what will be the result


    The result will be as following image.
    The image is not actually changed as we have given RGB Image and output is also displaying RGB image.

  • 'CV_LOAD_IMAGE_GRYASCALE'
    This will load image in gray scale format.
    we will use following code and see what will be the result


    The result will be as following image.
    The out put image is gray scale version of input image.

  • 'CV_LOAD_IMAGE_UNCHANGED'
    This will load image as it is.
    We can use this format if we want to load image in its original format.

Open-CV with Python in Ubuntu 11.10

Installing Open-CV python library in Ubuntu 11.10 is pretty much easy. You just have to install 'python-opencv' library and you are ready to go. Just copy and run following command to install 'python-opencv' library. You need to have superuser permission.

sudo apt-get install python-opencv

In order to test if it is installed properly, we will run a sample code 'test.py'. This code will open and display an image using opencv. Take any .jpg file and put it in a same folder as 'test.py'.
Now open 'test.py' in emacs or gedit or any of your favorite text editor and write the following code.
import cv
image = cv.LoadImageM("image_file_name.jpg")
cv.ShowImage("Title", image)
cv.WaitKey()

Now open terminal and go to the folder containing 'test.py'. Type the following command and you will see the image in a window.
python test.py

This window with image will disappear upon keyboard input. Thats it! you have successfully installed opencv libraries for python.

Accessing Camera using OpenCV

OpenCV is fast and customizable. So one can use it for real time image processing. Thus OpenCV comes out to be very useful for using in image processing Robotics applications. In many image processing based robotics applications, a camera is mounted in robot. Using input from mounted camera behavior of robot is controlled.

In this post we will access the camera of laptop or any webcam using opencv and produce live video stream. I am using opencv 2.1 with CodeBlocks IDE on Ubuntu 11.04. If you want help in installation and configurations, then refer here.

We will create a window using highgui, capture steam form webcam using cvCaptureFromCAM and convert it to image frames using IplImage. Compile and run the following code to get live stream from your webcam.

Installing OpenCV with CodeBlocks IDE on Ubuntu


EDIT: It was reported by some users that this method no longer works. I will post updated version for installation process shortly.


While using OpenCV on Linux I prefer using IDE as you can easily manage code and files when you are working on significantly bigger project. Following are the steps to configure CodeBlocks IDE on Ubuntu for OpenCV. I will be using opencv2.2 and CodeBlocks 10.5 in this post.

For OpenCV 2.3.1 with CodeBlocks on Ubuntu, refer to recent post
http://opencvlover.blogspot.in/2012/06/opencv-231-with-codeblocks-on-ubuntu.html

Installing CodeBlocks IDE and OpenCV

You can install both CodeBlocks and OpenCV using Synaptic package manager in ubuntu or just type following command in terminal

  • for CodeBlocks:
  • sudo apt-get install codeblocks
    
  • for Opencv:
  •  
    sudo apt-get install libcv1 libcvaux1 libcvaux-dev libcv-dev libhighgui1 libhighgui-dev opencv-doc
    
For OpenCV 2.3.1 Installation please refer to recent post
http://opencvlover.blogspot.in/2012/05/install-opencv-231-on-ubuntu-1204.html

Create CodeBlocks c++ project

Create codeblocks project from File > New > Project. A new project dialog will be opened. In project type select Console Application. Select Next. Now it will prompt you to name your project and select location for project files. Make sure to use GNU GCC compiler when prompted. Now your project creation in complete and you should see the codeblocks window as shown in below pic.


Cofiguring CodeBlocks for OpenCV

Now in menu bar go to Project > Build options. Under Linker tab, add "-lm -lcv -lhighgui -lcvaux"(without quotes) parameters in Other linker options. It should look like following pic.
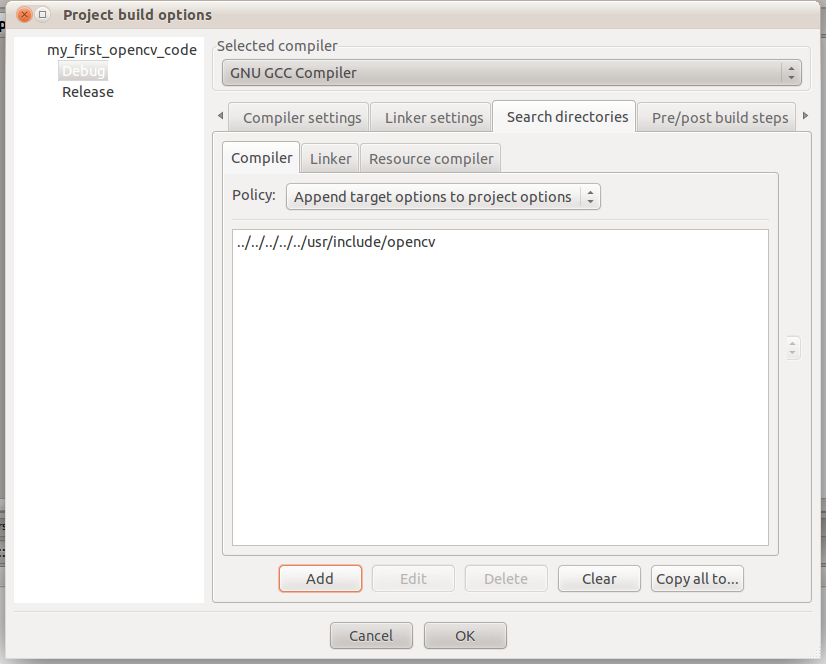


Now, under Search Directories tab, put the location of your opencv include folder. If you have installed opencv using synaptic package manager or apt-get then most probably it should be /usr/include/opencv/. If codeblocks asks for keeping this directory as a relative path then hit Yes.
It should look like following pic.


Now we are done with the setup. We will check our setup now.
Just build and run the following code. It will create a window named Hello and window will disappear upon hitting ESC.

Code:

#include <iostream>
#include <cv.h>
#include <highgui.h>
using namespace std;

int main()
{
    cvNamedWindow("Hello", 1);
    cvWaitKey(0);
    cvDestroyWindow("Hello");
    return 0;
}


Getting Started with OpenCV

Intro
OpenCV (Open Source Computer Vision Library) is a library of programming functions mainly aimed at real time computer vision, developed by Intel and now supported by Willow Garage. OpenCV is free to use under Open Source BSD license. OpenCV mainly focuses on real-time image processing. Being multi platform one can use openCV on linux as well as windows platform and with c++ as well as python.
OpenCV provides very good platform for developing robotics applications using image processing. One can also use Image processing toolkit from Matlab but I personally found OpenCV much faster that Matlab image processing toolkit.

Getting OpenCV
Latest Version of OpenCV can be downloaded from sourceforge using this link: http://sourceforge.net/projects/opencvlibrary/files/

Installation guides for various platforms are available here:
http://opencv.willowgarage.com/wiki/InstallGuide