Showing posts with label ubuntu. Show all posts

OpenCV 2.3.1 with CodeBlocks on Ubuntu 12.04

For Installing OpenCV 2.3.1 on ubuntu 12.04 please refer to previous post
http://opencvlover.blogspot.in/2012/05/install-opencv-231-on-ubuntu-1204.html

Once the installation is done, install codeblocks as mentioned in previous post http://opencvlover.blogspot.in/2011/07/installing-opencv-with-codeblocks-ide.html

Create a new console application as mentioned in above post and go to Build Options.
Make sure that GNU GCC compiler is selected in compiler drop down option.
Go to Linker Settings tab and Link libraries which are located at /usr/local/lib/ and looks like 'libopncv_*.so'
An example is shown in image below


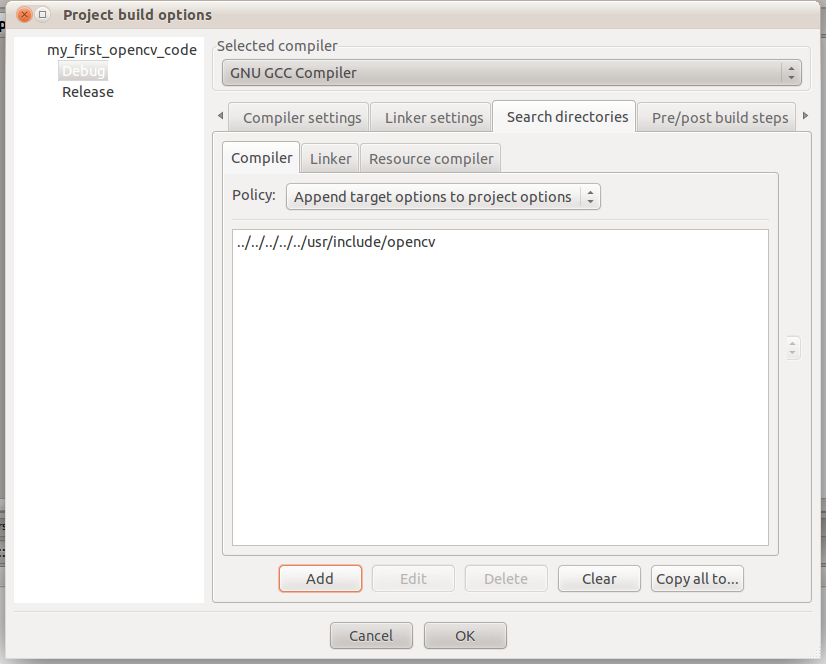
Now go to Search directories and under Compiler tab add following location
/usr/local/include/opencv2
Here is a screenshot


Now we are ready to run OpenCV 2.3.1 on Code Blocks running on Ubuntu 12.04.
Here is a sample code to test the installtion


Install Opencv 2.3.1 on Ubuntu 12.04 Precise Pangolin

Here are instructions for installation of Opencv 2.3.1 on Ubuntu 12.04 Precise Pangolin. For opencv installation we need FFmpeg, x264, v4l and their dependencies. It is a bit longer process as compared to windows installations. Step by step process is shown below.

1. Install dependencies for FFmpeg and x264
Enter following lines in terminal to check and install dependencies.
  
sudo apt-get install build-essential checkinstall git cmake libfaac-dev libjack-jackd2-dev libmp3lame-dev libopencore-amrnb-dev libopencore-amrwb-dev libsdl1.2-dev libtheora-dev libva-dev libvdpau-dev libvorbis-dev libx11-dev libxfixes-dev libxvidcore-dev texi2html yasm zlib1g-dev


2. Install Gstreamer by entering following lines in terminal
sudo apt-get install libgstreamer0.10-0 libgstreamer0.10-dev gstreamer0.10-tools gstreamer0.10-plugins-base libgstreamer-plugins-base0.10-dev gstreamer0.10-plugins-good gstreamer0.10-plugins-ugly gstreamer0.10-plugins-bad gstreamer0.10-ffmpeg


3. Download recent version (0.8+)of FFmpeg from https://github.com/FFmpeg/FFmpeg extract it and go to the directory. Now configure and install FFmpeg by entering following commons one by one.

./configure --enable-gpl --enable-libfaac --enable-libmp3lame --enable-libopencore-amrnb --enable-libopencore-amrwb --enable-libtheora --enable-libvorbis --enable-libx264 --enable-libxvid --enable-nonfree --enable-postproc --enable-version3 --enable-x11grab
make
sudo make install


4. Install recent version of x264 from ftp://ftp.videolan.org/pub/videolan/x264/snapshots/ extract it and go to the directory. Now configure and install x264 by entering following commons one by one.

./configure --enable-static
make
sudo make install


5. Download video for linux v4l libs from http://www.linuxtv.org/downloads/v4l-utils/ extract it and go to the directory. Install v4l using following command.
make
sudo make install


6. Install gtk libs using apt-get
sudo apt-get install libgtk2.0-0 libgtk2.0-dev


7. Install libjpeg using following command
sudo apt-get install libjpeg62 libjpeg62-dev


8. Now our dependencies are complete. We can install Opencv now. Download Opencv from http://sourceforge.net/projects/opencvlibrary/files/opencv-unix/ Extract it and go to the directory. Enter following command to configure and install Opencv
mkdir build
cd build
cmake ..
make
sudo make install


We are done with installing Opencv on ubuntu 12.04 Precise Pangolin. In order to set path open /etc/bash.bashrc using your favorite text editor and add following lines
PKG_CONFIG_PATH=$PKG_CONFIG_PATH:/usr/local/lib/pkgconfig
export PKG_CONFIG_PATH


Restart your system and you are ready to use awesome Opencv!

Open-CV with Python in Ubuntu 11.10

Installing Open-CV python library in Ubuntu 11.10 is pretty much easy. You just have to install 'python-opencv' library and you are ready to go. Just copy and run following command to install 'python-opencv' library. You need to have superuser permission.

sudo apt-get install python-opencv

In order to test if it is installed properly, we will run a sample code 'test.py'. This code will open and display an image using opencv. Take any .jpg file and put it in a same folder as 'test.py'.
Now open 'test.py' in emacs or gedit or any of your favorite text editor and write the following code.
import cv
image = cv.LoadImageM("image_file_name.jpg")
cv.ShowImage("Title", image)
cv.WaitKey()

Now open terminal and go to the folder containing 'test.py'. Type the following command and you will see the image in a window.
python test.py

This window with image will disappear upon keyboard input. Thats it! you have successfully installed opencv libraries for python.

Installing OpenCV with CodeBlocks IDE on Ubuntu


EDIT: It was reported by some users that this method no longer works. I will post updated version for installation process shortly.


While using OpenCV on Linux I prefer using IDE as you can easily manage code and files when you are working on significantly bigger project. Following are the steps to configure CodeBlocks IDE on Ubuntu for OpenCV. I will be using opencv2.2 and CodeBlocks 10.5 in this post.

For OpenCV 2.3.1 with CodeBlocks on Ubuntu, refer to recent post
http://opencvlover.blogspot.in/2012/06/opencv-231-with-codeblocks-on-ubuntu.html

Installing CodeBlocks IDE and OpenCV

You can install both CodeBlocks and OpenCV using Synaptic package manager in ubuntu or just type following command in terminal

  • for CodeBlocks:
  • sudo apt-get install codeblocks
    
  • for Opencv:
  •  
    sudo apt-get install libcv1 libcvaux1 libcvaux-dev libcv-dev libhighgui1 libhighgui-dev opencv-doc
    
For OpenCV 2.3.1 Installation please refer to recent post
http://opencvlover.blogspot.in/2012/05/install-opencv-231-on-ubuntu-1204.html

Create CodeBlocks c++ project

Create codeblocks project from File > New > Project. A new project dialog will be opened. In project type select Console Application. Select Next. Now it will prompt you to name your project and select location for project files. Make sure to use GNU GCC compiler when prompted. Now your project creation in complete and you should see the codeblocks window as shown in below pic.


Cofiguring CodeBlocks for OpenCV

Now in menu bar go to Project > Build options. Under Linker tab, add "-lm -lcv -lhighgui -lcvaux"(without quotes) parameters in Other linker options. It should look like following pic.


Now, under Search Directories tab, put the location of your opencv include folder. If you have installed opencv using synaptic package manager or apt-get then most probably it should be /usr/include/opencv/. If codeblocks asks for keeping this directory as a relative path then hit Yes.
It should look like following pic.


Now we are done with the setup. We will check our setup now.
Just build and run the following code. It will create a window named Hello and window will disappear upon hitting ESC.

Code:

#include <iostream>
#include <cv.h>
#include <highgui.h>
using namespace std;

int main()
{
    cvNamedWindow("Hello", 1);
    cvWaitKey(0);
    cvDestroyWindow("Hello");
    return 0;
}